
Previous Story
How To Force Padlocks – Part 2
Posted On 21 Jul 2014
Using The Tools of The Trade
After we’ve completed our size-up of the padlock, we need to apply our tools to the problem. Remember, we always want to go after the weakest part of the puzzle, whether that is the lock or the hardware it is attached to.
We have a variety of tools at our disposal for forcible entry, aside from the obvious (the Irons). Let’s look at 5 of them.
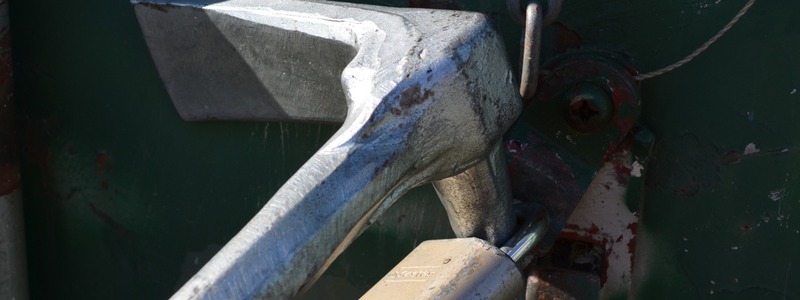
 #1 – The Duck Billed Lock Breaker
One tool which is excellent for this application is probably lurking somewhere on your rig – lonely, tucked away in a cabinet, forgotten about. This tool is the Duck Billed Lock Breaker.
The Duck Billed Lock Breaker is a tool that is solely intended for the use of forcing padlocks. It works by driving the body of the lock off the shackle. The tool is placed into the shackle of the lock and driven down by a maul, a flat head axe or even a Halligan. Since the tool is tapered, each time it is struck there is more and more force being applied to the lock. Eventually the lock gives and you are in.
#2 – The Partner Saw
The Partner Saw is an extremely useful tool for forcible entry, especially in the commercial building environment. It is ideally useful in the forcing of locks associated with roll down gates that at times can be heavily fortified. It can, however, be used to force a simple padlock if available. When using the saw to force a lock, there are some things we need to keep in mind.
Use The Right Blade
Be sure to use the aluminum oxide (metal cutting) blade on the saw.
Rotate The Lock
Rotate the lock into the best position. It is useful to have a pair of vice grips that can be attached to the lock to hold it, if necessary. A chain attached to the vice grips allows another firefighter to hold it in place easily and safely.
Get In The Groove
Once the saw is started and ready to use, it is important to get a groove going in the lock prior to applying full throttle to the saw. If you attempt to start your cut at full throttle, chances are your blade would slide all over the place.
Instead, rev the saw, then let it idle down a bit. As the blade slows, place it on the part of the lock you wish to cut. This will start the cut for you. Once you have the cut started, you can proceed as normal. (If you are cutting the shackle, cut through both ends of the shackle at the same time.)
Cutting The Hockey Puck Lock
If you are trying to cut an American 2000 Series “hockey puck” lock, cut 3/4 of the way across the body on the end opposite of the keyway. If the lock is still engaged after you finish cutting, strike it with the axe of the Halligan. This will usually remove the lock.
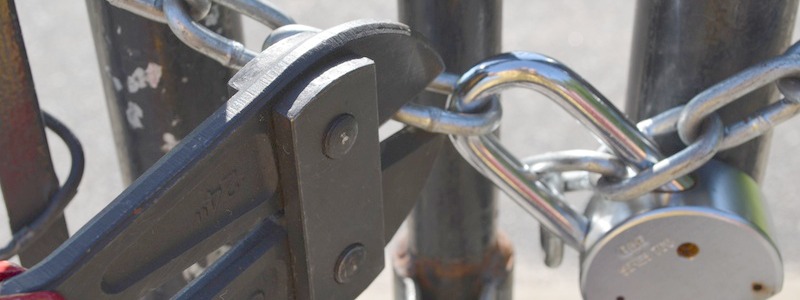
#3 – Bolt Cutters
Good old-fashioned bolt cutters make quick work of most padlocks. Be sure to use them on light duty padlocks, because anything that is case hardened is going to do nothing but ruin the jaws on your bolt cutters.
Often people will spend a ton of money on a great padlock and attach a cheap chain to the lock. Attack the chain and you are done in under ten seconds.
I run a lot of EMS alarms in my district at schools and parks, and the bolt cutters I carry see a lot of use. Everyone knows if I come up on the air and say I used my “keys” to get in, I cut the chain on the gate.
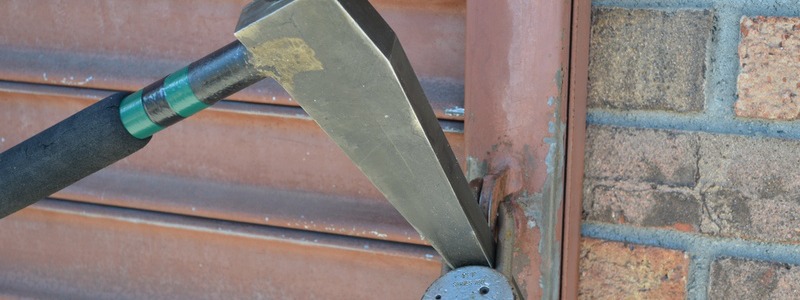
#4 – The Halligan
If you are without a Partner Saw or a Duck Billed Lock Breaker, it is still possible to win the battle with a padlock.
You can take the lock by applying the pike of the Halligan tool through the shackle of the lock and striking down with the axe. If you choose to go after the hasp instead of the lock, simply take the adz of the tool and place it behind the hasp and drive it down with the axe. The bolts holding the hasp will give and the whole unit will come off the door.
The same holds true with the slide bolt. You can try to use the pike, but if that isn’t working out, simply take the fork and place it through the hasp of the lock. Rotate the Halligan tool and apply enough force that either the lock itself gives or the slide bolt comes apart.
#5 – Pipe Wrench
A pipe wrench can be used to force “hockey puck” style locks. This is probably the least preferred method of taking this style lock and for it to work you must have a clear shot at the lock. No guarding or shrouding can be present.
Take the pipe wrench and get a good bite on the lock. Apply force downward on the end of the wrench. Many times you will have to apply a “cheater” bar over the end of the wrench to gain added leverage for the lock to fail.
As you can see we have many options at our disposal to force the variety of padlocks that we may come across. If you have any additional tips or tricks to defeat padlocks, please leave them in the comments section.
Photos courtesy of Rob Fling.
Check out the complete series here:
How To Force Padlocks – Part 1 (basics)
How To Force Padlocks – Part 2 (techniques)


The duckbill in the first picture is being used incorrectly. The duckbill is used to separate the shackle from the lock. It should be positioned with the top edge of the wedge on the top of the shackle and the bottom edge of the duckbill on the body of the lock. The way it is positioned in picture 1 you will be beating on the lock all day. It might eventually work but it’s going to take a lot more time and effort. Back to basics.
Jim, you are 100% correct. I ended up sending that pic in error, that was actually a new tool that I was using. On trying it out on multiple locks I found that the tool itself was too large to position correctly. I had placed it like that to take the picture to show members of my department. I subsequently took the tool back to the firehouse and ground down the tool to fit more locks successfully. Great heads up catch!