
Previous Story
How To Check The Fire Pump
Posted On 05 May 2014
Checking The Fire Pump
One of the worst things that can happen on the fire ground is when the nozzle team loses water in a hostile fire environment and are now in harm’s way. This happens because of a lack of water or a failure of equipment.
To ensure our pump will work on the fire ground, one of the most important checks we can do as a pump operator is verify our pump is working properly. This is called “Checking the Pump”.
These steps will make sure our fire pump is ready and operational:
Step 1 – Check the Water Level
- Make sure we have water in our tank.
- Do not go by the electronic level gauge. Get up on top of our unit and visualize through the hatch to make sure it is full.
Notes:
*Don’t assume the water tank is full. Some engineers are lazy or forgot to fill up or top off the tank water from an earlier call so don’t assume it’s full.
Step 2 – Place Unit in Pump
- Pull unit outside and into an open area.
- Chock the wheels
- Ensure unit is in neutral and parking brake is set. (Place the unit chalk and cones out when you have a chance.)
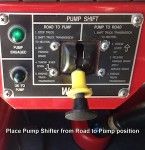
- Switch the pump shifter knob from road into the pump position.
- Verify the first indicator light comes on.
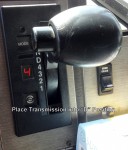
- Now place the unit into DRIVE (D) on your transmission shifter.
-
- “OK” to pump light is not on.
-
- Step 2 – #6
-
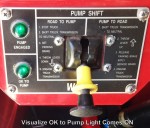
- See Green Lights on Left Side. “OK” to pump light is on. This means the pump is engaged. It is now Ok to pump.
-
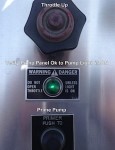
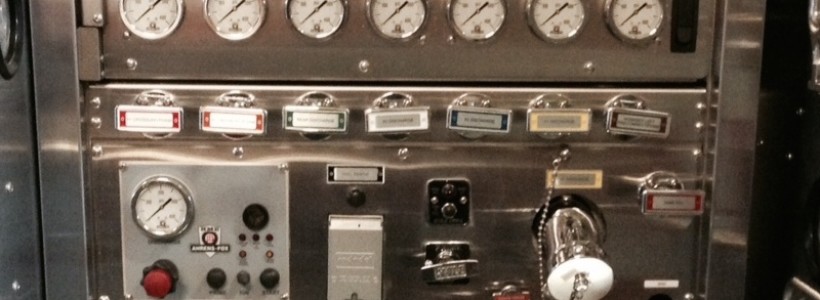
- Pump Panel “OK” To Pump Indicator below the Throttle Handle
-
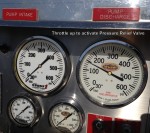
- Pump Panel Gauges
-
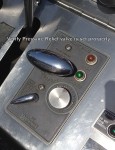
- Pressure Relief Knob on this engine.
Notes:
- The visual transmission reader will read 4th gear and the second indicator light will come one saying OK to pump. (Note: See unit transmission switch to 4th gear is another indicator you are in pump)
- The units RPM’s will also increase to about 900 – 1100 rpm’s. (Average idle speed)
- The pump discharge gauge will read 30 psi while unit is in idle. (Note: this is due to the engine now transferring its power to the pump and has disengaged from the rear drive shaft.)
Step 3 -Build up Pump Pressure
- Proceed to your pump panel and open your tank to pump and open the tank fill 1/8 to 1/4. (This is called “crack your tank fill” and will re-circulate water within your pump)
- Make sure if you have a 2 stage pump that it is set in the right mode; Volume or Pressure. (Note: Never operate pump transfer switch at any pressure over 50 psi)
- Check that the OK to pump light is on and activate your primer for no more than 30 seconds (1250 GPM Pump or less) or 45 Seconds (1250 GPM Pump or more). This will expel any air out of your pump.
- Turn throttle nob slowly and increase Engine RPM and pump pressure. Watch both your engine RPM reading and pump discharge gauge. This will give you a proper range that these numbers work in. If the RPM’s are too high during pumping operations, recognize there is a problem and make adjustments.
Step 4 – Check and Set the Pressure Relief Valve
- Continue to increase throttle to see when your pressure relief valve will activate.
- Your pressure relief valve shall be set to your highest pre-connected line on your unit.
Notes:
- If the pressure relief valve does not activate properly, you will have to reset it to the proper pressure by turning the handle on the pressure relieve valve.
- Turning the pressure relief valve clockwise and counter-clockwise with increase or decrease our pressure settings until the desired pressure is achieved.
Step 5 – Return Unit To State of Readiness
After we have set the pressure relief valve we need to return our unit to a state of readiness. (Ex: Tank to Pump is open, tank fill is cracked, have a grease pencil or dry eraser marker available)
- Reduce pump throttle to idle
- Close the tank to pump
- Close the tank fill
- Goto cab and place the transmission shifter to neutral and ensure the RPM’s drop.
- Set Pump Shifter back to ROAD position and verify all indicator lights are off.
- Put away the wheel chock and return unit to the station bay ready for the next call.
Notes:
- Always chock the wheels when doing a pump check. In case the transmission engages and the unit want to drive forward, you will have some protection.
- Always have a spotter when backing into the station.
SCROLL_TEXT
After following these steps we will know that our pump is ready and operational. In the event we do get a fire during our shift we know we will be able to do our job effectively and efficiently, because we checked out our fire pump correctly.
Photos Courtesy of Chris Adams Firefighter Toolbox
Hey Chris, good article. One additional thing that I do to ensure my pressure relief valve is working is to open the tank fill/recirculating valve all of the way. When you close the valve, it increases the pdp and it makes sure that the relief valve will dump the pressure, avoiding large pressure spikes for the nozzle man. When you open the valve all of the way, the relief valve should close. I notice that very few people on our department don’t know about doing this to exercise the relief valve. I look forward to more articles from you. Thanks again.
Gary,
Great suggestion in one of my future articles we will be discussing the Pressure Relief more in detail. Thank you for your comment and I hope you can share more with our readers.
There is another good check for the pump. Open you tank fill all the way. Next throttle the pump up to 100 psi. Then record your RPM’s on the pump. As you do this every day you check the pump you will start to see the RPM’s go up as the pump needs to work harder to achieve the same pressures as when it was newer. Could be an indication on need for maintenance.
One correction to my article obove is that idle RPM’s are usually around 600 – 900 not 900 to 1100. The higher pressure is for fast idle speeds.